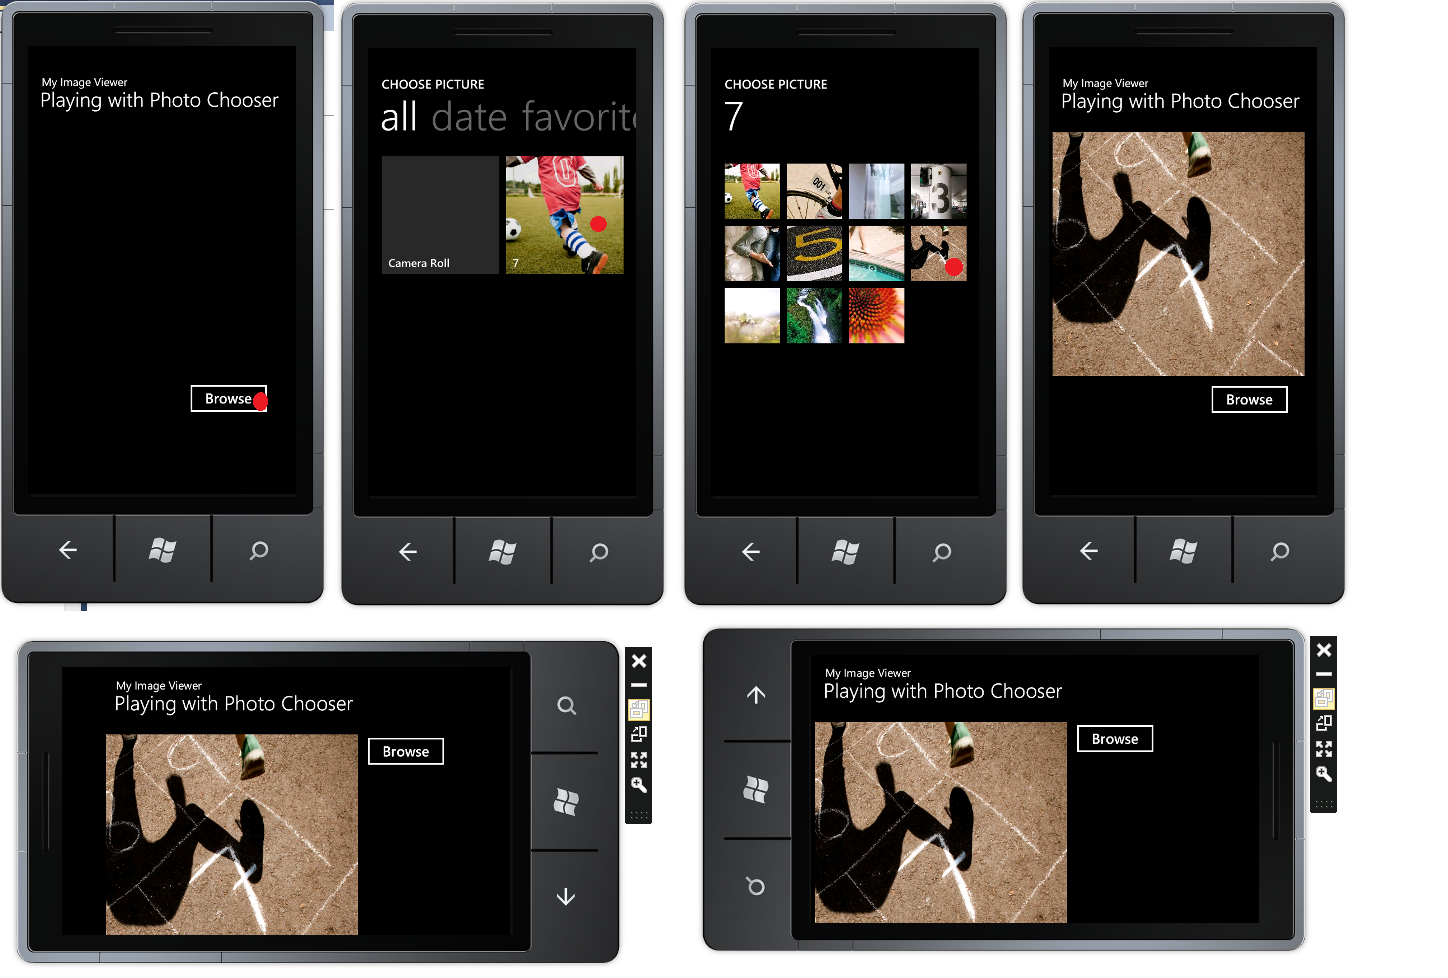
I created my first sample app in Windows Phone 7. In this app I done a small image viewer application and also implemented Landscape handling too..
I just wrote few lines code for this, every thing taken care by inbuilt class.
I just wrote photoChooserTask.Show() this line to open photo chooser. It will list the photos in WP7. After selecting the photo it will send that information. So, I just set that photo to an image control
here is the XAML code:-
x:Class=”WP7Screen.MainPage”
xmlns=”http://schemas.microsoft.com/winfx/2006/xaml/presentation”
xmlns:x=”http://schemas.microsoft.com/winfx/2006/xaml”
xmlns:phone=”clr-namespace:Microsoft.Phone.Controls;assembly=Microsoft.Phone”
xmlns:shell=”clr-namespace:Microsoft.Phone.Shell;assembly=Microsoft.Phone”
xmlns:d=”http://schemas.microsoft.com/expression/blend/2008″
xmlns:mc=”http://schemas.openxmlformats.org/markup-compatibility/2006″
mc:Ignorable=”d” d:DesignWidth=”480″ d:DesignHeight=”768″
FontFamily=”{StaticResource PhoneFontFamilyNormal}”
FontSize=”{StaticResource PhoneFontSizeNormal}”
Foreground=”{StaticResource PhoneForegroundBrush}”
SupportedOrientations=”Portrait” Orientation=”Portrait”
shell:SystemTray.IsVisible=”True” xmlns:my=”clr-namespace:Microsoft.Phone.Controls.Maps;assembly=Microsoft.Phone.Controls.Maps” VerticalContentAlignment=”Stretch”>
<!–LayoutRoot is the root grid where all page content is placed–>
<Grid x:Name=”LayoutRoot” Background=”Transparent” DataContext=”{Binding}”>
<Grid.RowDefinitions>
<RowDefinition Height=”Auto”/>
<RowDefinition Height=”Auto”/>
<RowDefinition Height=”*”/>
</Grid.RowDefinitions>
<Grid.ColumnDefinitions>
<ColumnDefinition Width=”Auto” />
<ColumnDefinition Width=”0″ x:Name=”LandscapeColumn” />
<ColumnDefinition Width=”12*” />
</Grid.ColumnDefinitions>
<!–TitlePanel contains the name of the application and page title–>
<StackPanel x:Name=”TitlePanel” Grid.Row=”0″ Margin=”12,17,0,28″>
<TextBlock x:Name=”ApplicationTitle” Text=”My Image Viewer” Style=”{StaticResource PhoneTextNormalStyle}”/>
<TextBlock x:Name=”PageTitle” Text=”Playing with Photo Chooser” Margin=”9,-7,0,0″ Style=”{StaticResource PhoneTextTitle1Style}” FontSize=”36″ />
</StackPanel>
<Image Grid.Row=”1″ HorizontalAlignment=”Left” Margin=”6,6,6,6″ Name=”imageArea” Stretch=”Fill” VerticalAlignment=”Top” Width=”450″ Height=”436″ />
<Button Grid.Row=”2″ Content=”Browse” Height=”72″ HorizontalAlignment=”Left” Name=”imageBrowseBtn” Click=”imageBrowseBtn_Click” VerticalAlignment=”Top” Width=”160″ Margin=”278,0,0,0″ />
</Grid>
</phone:PhoneApplicationPage>
Here is the C# code
using System.Collections.Generic;
using System.Linq;
using System.Net;
using System.Windows;
using System.Windows.Controls;
using System.Windows.Documents;
using System.Windows.Input;
using System.Windows.Media;
using System.Windows.Media.Animation;
using System.Windows.Shapes;
using Microsoft.Phone.Controls;
using Microsoft.Phone.Tasks;
namespace WP7Screen
{
public partial class MainPage : PhoneApplicationPage
{
// Declare the PhotoChooserTask object with page scope.
PhotoChooserTask photoChooserTask;
// Constructor
public MainPage()
{
InitializeComponent();
SupportedOrientations = SupportedPageOrientation.Portrait | SupportedPageOrientation.Landscape;
photoChooserTask = new PhotoChooserTask();
photoChooserTask.Completed += new EventHandler<PhotoResult>(photoChooserTask_Completed);
this.OrientationChanged += new EventHandler<OrientationChangedEventArgs>(Page_OrientationChanged);
}
private void imageBrowseBtn_Click(object sender, RoutedEventArgs e)
{
photoChooserTask.Show();
}
void photoChooserTask_Completed(object sender, PhotoResult e)
{
if (e.TaskResult == TaskResult.OK)
{
System.Windows.Media.Imaging.BitmapImage bmp =new System.Windows.Media.Imaging.BitmapImage();
bmp.SetSource(e.ChosenPhoto);
imageArea.Source = bmp;
}
}
void Page_OrientationChanged(object sender, OrientationChangedEventArgs e)
{
if ((e.Orientation & PageOrientation.Landscape) != 0)
{
LandscapeColumn.Width = GridLength.Auto;
Grid.SetRow(imageBrowseBtn, 1);
Grid.SetColumn(imageBrowseBtn, 1);
LayoutRoot.ColumnDefinitions[1].Width = GridLength.Auto;
//Here margin left is set to 0
imageBrowseBtn.Margin = new Thickness(0);
}
else
{
LandscapeColumn.Width = new GridLength(0);
Grid.SetRow(imageBrowseBtn, 2);
Grid.SetColumn(imageBrowseBtn, 0);
LayoutRoot.ColumnDefinitions[1].Width = new GridLength(0);
//Here margin left is set to 278
imageBrowseBtn.Margin = new Thickness(278, 0, 0, 0);
}
}
}
}
And here is my output

This is my first Windows phone 7 work…!
Enjoy while coding..!
Thanks,
Naga Harish.

I found your post very helpful and useful, could you help me with something i am trying to create, maybe give me an example or the do the first part so i can continue myself
I want to create a App which allows the user to select from a category of road signs (images) and then display a image of the road sign showing its meaning.
First page: shows different selections as a button/hyper-link for example: Information Signs, Road Marking Sign, Public Signs or Parking Signs
Second Page: After the user selects a category for example Road Marking Signs, they can now see a number of different road marking images, which they can scroll through and select one.
Third page: After selecting the images the third page will show the image of the sign followed by a description of the sign.
The above text shows a short description of the type of App i am trying to create if you can show me how i can do this it would be very helpful for me, please reply back. You can also contact me through my email if you like.
Thanks
Rahul
Hi Rahul,
Have look on this http://www.codeguru.com/csharp/.net/net_general/article.php/c17025 . I have seen one more site it is best for your app. But, I unable to call back now. If I got I will send that URL also. But you can start with this.
Thanks
have you got my mail? I sent source code one simple example