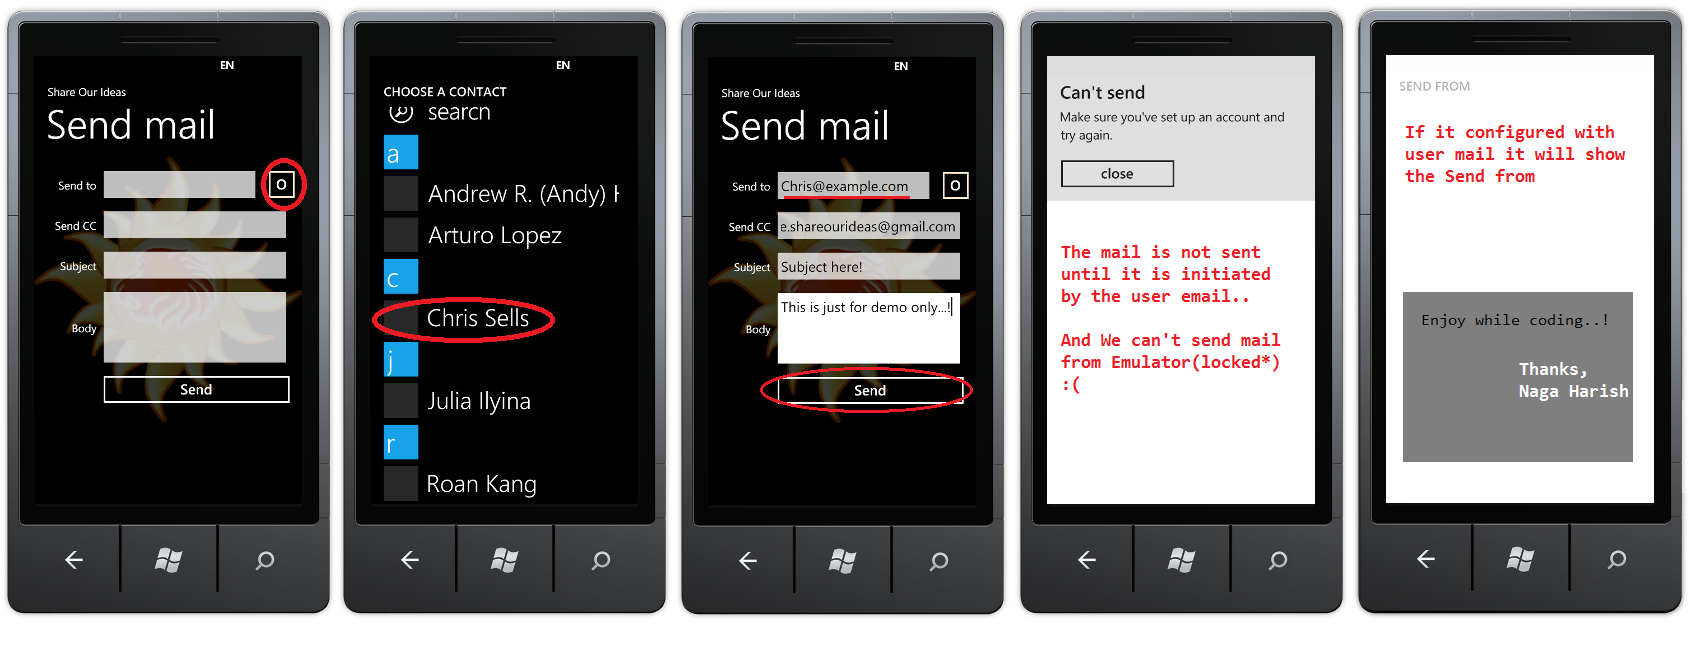
In this post I am going to show how to send mail from Windows phone 7(wp7).
For send mail we need to use EmailComposeTask and EmailAddressChooserTask (for selecting email id in phone).
Then highlighted code is here for sending mail.
Code:-
emailComposeTask.To = “tomail@localhost.com”;
emailComposeTask.Cc = “ccmail@localhost.com”;
emailComposeTask.Subject =”Your Subject here”;
emailComposeTask.Body = “Your mail content here”;
emailComposeTask.Show(); // Launches send mail screen
Please check with image design and how it works

Here My Xaml code (Mainpage.xaml)
x:Class=”EmailComposeTask.MainPage”
xmlns=”http://schemas.microsoft.com/winfx/2006/xaml/presentation”
xmlns:x=”http://schemas.microsoft.com/winfx/2006/xaml”
xmlns:phone=”clr-namespace:Microsoft.Phone.Controls;assembly=Microsoft.Phone”
xmlns:shell=”clr-namespace:Microsoft.Phone.Shell;assembly=Microsoft.Phone”
xmlns:d=”http://schemas.microsoft.com/expression/blend/2008″
xmlns:mc=”http://schemas.openxmlformats.org/markup-compatibility/2006″
mc:Ignorable=”d” d:DesignWidth=”480″ d:DesignHeight=”768″
FontFamily=”{StaticResource PhoneFontFamilyNormal}”
FontSize=”{StaticResource PhoneFontSizeNormal}”
Foreground=”{StaticResource PhoneForegroundBrush}”
SupportedOrientations=”Portrait” Orientation=”Portrait”
shell:SystemTray.IsVisible=”True”>
<!–LayoutRoot is the root grid where all page content is placed–>
<Grid x:Name=”LayoutRoot”>
<Grid.RowDefinitions>
<RowDefinition Height=”Auto”/>
<RowDefinition Height=”*”/>
</Grid.RowDefinitions>
<!–TitlePanel contains the name of the application and page title–>
<StackPanel x:Name=”TitlePanel” Grid.Row=”0″ Margin=”12,17,0,28″>
<TextBlock x:Name=”ApplicationTitle” Text=”Share Our Ideas” Style=”{StaticResource PhoneTextNormalStyle}”/>
<TextBlock x:Name=”PageTitle” Text=”Send mail” Margin=”9,-7,0,0″ Style=”{StaticResource PhoneTextTitle1Style}”/>
</StackPanel>
<!–ContentPanel – place additional content here–>
<Grid x:Name=”ContentPanel” Grid.Row=”1″ Margin=”12,0,12,0″>
<Grid.RowDefinitions>
<RowDefinition Height=”Auto”/>
<RowDefinition Height=”Auto”/>
<RowDefinition Height=”Auto”/>
<RowDefinition Height=”Auto”/>
<RowDefinition Height=”Auto”/>
</Grid.RowDefinitions>
<Grid.ColumnDefinitions>
<ColumnDefinition Width=”100″/>
<ColumnDefinition Width=”*”/>
</Grid.ColumnDefinitions>
<TextBlock Text=”Send to” Grid.Row=”0″ Grid.Column=”0″ HorizontalAlignment=”Right” VerticalAlignment=”Center”/>
<StackPanel Grid.Row=”0″ Grid.Column=”1″ Orientation=”Horizontal”>
<TextBox x:Name=”txtMailTo” Width=”295″/>
<Button Content=”O” BorderBrush=”Bisque” x:Name=”btnOpenContact” Click=”btnOpenContact_Click”/>
</StackPanel>
<TextBlock Text=”Send CC” Grid.Row=”1″ Grid.Column=”0″ HorizontalAlignment=”Right” VerticalAlignment=”Center”/>
<StackPanel Grid.Row=”1″ Grid.Column=”1″ Orientation=”Horizontal”>
<TextBox x:Name=”txtMailCC” Width=”350″/>
</StackPanel>
<TextBlock Text=”Subject” Grid.Row=”2″ Grid.Column=”0″ HorizontalAlignment=”Right” VerticalAlignment=”Center”/>
<StackPanel Grid.Row=”2″ Grid.Column=”1″ Orientation=”Horizontal”>
<TextBox x:Name=”txtSubject” Width=”350″/>
</StackPanel>
<TextBlock Text=”Body” Grid.Row=”3″ Grid.Column=”0″ HorizontalAlignment=”Right” VerticalAlignment=”Center”/>
<StackPanel Grid.Row=”3″ Grid.Column=”1″ Orientation=”Horizontal”>
<TextBox x:Name=”txtBody” Width=”350″ AcceptsReturn=”True” Height=”150″/>
</StackPanel>
<Button Content=”Send” Grid.Row=”4″ Grid.Column=”1″ x:Name=”btnSendMail” Click=”btnSendMail_Click”/>
</Grid>
</Grid>
</phone:PhoneApplicationPage>
And here is my C# code (mainpage.xaml.cs)
/*Import*/
namespace EmailComposeTask
{
public partial class MainPage : PhoneApplicationPage
{
Microsoft.Phone.Tasks.EmailAddressChooserTask emailAddressChooserTask;// Constructor
public MainPage()
{
InitializeComponent();
this.emailAddressChooserTask = new Microsoft.Phone.Tasks.EmailAddressChooserTask();
this.emailAddressChooserTask.Completed += new EventHandler<Microsoft.Phone.Tasks.EmailResult>(emailAddressChooserTask_Completed);
}
#region Events
//Open Contact button click
private void btnOpenContact_Click(object sender, RoutedEventArgs e)
{
emailAddressChooserTask.Show();
}
//Email Address Chooser Task Completed
private void emailAddressChooserTask_Completed(object sender, Microsoft.Phone.Tasks.EmailResult e)
{
if (e.TaskResult == Microsoft.Phone.Tasks.TaskResult.OK)
{
txtMailTo.Text = e.Email;
}
}
//Send mail button click
private void btnSendMail_Click(object sender, RoutedEventArgs e)
{
Microsoft.Phone.Tasks.EmailComposeTask emailComposeTask = new Microsoft.Phone.Tasks.EmailComposeTask();
emailComposeTask.To = txtMailTo.Text;
emailComposeTask.Cc = txtMailCC.Text;
emailComposeTask.Subject = txtSubject.Text;
emailComposeTask.Body = txtBody.Text;
emailComposeTask.Show();
}
#endregion
}
}
* Here we want know one more thing, when Send mail Launcher open, your application will go to deactivated and is no longer running. After completing the task, the user can return to your application, at which point it is reactivated.
For more details please check this URL http://msdn.microsoft.com/en-us/library/ff769550%28VS.92%29.aspx#BKMK_Email
Enjoy while coding..!
Thanks,
Naga Harish.

Wow,my problem has been solved by your method.thanks very much.
Book marked, I really like your site! 🙂
hi
I have used the same code for sending emails. but when i click on close button i am not redirected to the previous page. Could you pls let me the know the code for that.
Is it?
Have you check with this page http://msdn.microsoft.com/en-us/library/ff769550%28VS.92%29.aspx#BKMK_Email
But, it must go to compose page
Still can’t send email..
Are you trying in simulator or device?